Difference between revisions of "Position (Bubble property)"
| (2 intermediate revisions by the same user not shown) | |||
| Line 1: | Line 1: | ||
==Scope== | ==Scope== | ||
| − | * '''[[Simulation]]''' | + | * '''[[Simulation]]''' content object > '''[[Input Text (macro)|Input Text]]''' macro > '''Demo|Practice Bubble''' > '''Position''' property |
| − | * '''[[Simulation]]''' | + | * '''[[Simulation]]''' content object > '''[[Key-Stroke]]''' macro > '''Demo|Practice Bubble''' macro > '''Position''' property |
| − | * '''[[Simulation]]''' | + | * '''[[Simulation]]''' content object > '''[[Mouse Action (Simulation macro)|Mouse Action]]''' macro > '''Demo|Practice Bubble''' macro > '''Position''' property |
| − | * '''[[Simulation]]''' | + | * '''[[Simulation]]''' content object > '''[[Explanation]]''' macro > '''Demo|Practice Bubble''' macro > '''Position''' property |
==Purpose== | ==Purpose== | ||
Latest revision as of 19:27, 26 April 2021
Scope
- Simulation content object > Input Text macro > Demo|Practice Bubble > Position property
- Simulation content object > Key-Stroke macro > Demo|Practice Bubble macro > Position property
- Simulation content object > Mouse Action macro > Demo|Practice Bubble macro > Position property
- Simulation content object > Explanation macro > Demo|Practice Bubble macro > Position property
Purpose
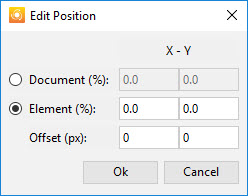
This property specifies the position of the 'anchor point' of the Bubble relative to either the associated screen control, or the entire screenshot. Clicking on the Edit button to the right of this property displays the following dialog box:
The fields in this dialog box are used as follows:
- Document (%): Select this option to specify the position of the Bubble anchor point relative to the entire screenshot, and then specify the X and Y fields as follows:
- X: Specify the percentage of the way along the X axis from leftmost edge of the screenshot at which the Bubble anchor point should be located.
- Y: Specify the percentage of the way down the Y axis from top edge of the screenshot at which the Bubble anchor point should be located.
- Element (%): Select this option to specify the position of the Bubble anchor point relative to the screen element (see the Control > Position and Size property) at which the Bubble anchor point should be located, and then specify the X and Y fields as follows:
- X: Specify the percentage of the way along the X axis from the leftmost edge of the object at which the Bubble anchor point should be located.
- Y: Specify the percentage of the way down the Y axis from the top edge of the object at which the Bubble anchor point should be located.
- Offset (px) | X: Specify the number of pixels by which the Bubble anchor point should be shifted (to the right for a positive number, to the left for a negative number) from the initial position specified by the Element (%) X value.
- Offset (px) | Y: Specify the number of pixels by which the Bubble anchor point should be shifted (down for a positive number, up for a negative number) from the initial position specified by the Element (%) Y value.
You may notice that SAP Enable Now often uses a default offset of 4 or -4. This is because the Highlight has a width of 4px, so offsetting the Bubble anchor point by 4px will ensure that the tip of the bubble pointer is never obscured by the Highlight. In some cases, an offset of 6 or -6 is used. This is to pull the Bubble anchor point slightly inside the element (as opposed to pointing to it's exact corner), to avoid possible confusion when two screen elements are directly next to each other.
- Working With Enable Now Bubbles (Enable Now Expert YouTube channel)
